
Guide to Windows XP Task Manager Part II

In Part I of the Windows XP Task Manager series, we talked about ending programs in Task Manager and in this second part we are going to cover the Processes tab in more detail because it’s full of useful information.
Now we ended off by saying that if your program does not die by clicking the End Task button on the Applications tab, then you can right click on the program and choose “Go to process“. This will bring you to the Processes tab, which shows you the executable that is running in Windows for that particular program.
The process that is running that program is automatically highlighted when you choose the go to process option. The Process tab gives you more detailed information on every process running on the system, whether it be a user process or a system process. The Image Name is the name of the process, User Name is whether it is a user process or a Windows XP process, CPU is the percentage of the processor time that a particular application is taking up, and Mem Usage is how much RAM memory is being used. You can click on any header to sort the list by that column like I have in the screenshot below using Mem Usage.

What I found out using the task manager was that Google Chrome eats up huge amounts of memory. Above, there is only one IE process and it’s using about 114 MB of RAM with one window open. Now check the how many processes are there for Google Chrome and how much memory is being taken up:

The other column you’ll be sorting a lot is CPU. Go ahead and click on the header and you should see the System Idle process at the very top. Normally, that process should be the one with the highest CPU value. If it takes several minutes to do something that normally takes a few seconds, it could be caused by a process with a very high CPU usage. Also, you’ll notice that the processes keep shifting up and down and that’s because one becomes active and then might stop and another process moves to the foreground, etc. At the bottom of the Task Manager window you’ll see the CPU Usage status. This number should be pretty low for a desktop computer.

Now to really kill a program, you can right click on the process itself and choose either End Process or End Process Tree. Try end process first and if that does not work try end process tree. The process tree option basically means that if this process was started up by some other process or if it spawned child processes, all processes in the entire tree starting from the parent will be killed. So if you opened IE and that caused the Flash process to start, then if you choose End Process Tree on the IE process, it will also end the Flash process.

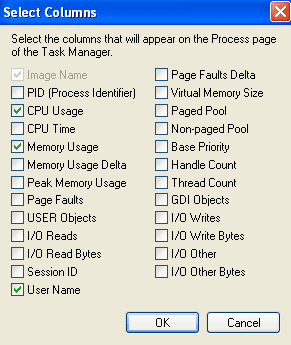
You’ll also notice that by default there are only four columns listed in the Task Manager for processes. You can actually choose a bunch more columns by clicking on View from the top menu and choosing “Select columns…“.

As you can see, there are a lot of properties for a process that you can view. Some of the more useful ones are PID, Page Faults, Thread Count, and Non-Paged Pool. If you’re interested, you can read more about these by doing a search on Google.
The last thing you can do for a process is to set how much of the CPU you want it to use and which CPU you want a process to run on. Of course, the second statement is only valid if you have a computer with more than one processor, but since dual and quad core computer are fairly common now, it’s something you might want to do.
If you right click on the process name, you see two options at the bottom, Set Priority and Set Affinity. Priority is exactly that: what kind of privilege do you want to give or take from a process. If you’re running something like an anti-virus scan, but hate the fact that it completely disables your ability to do anything else on the computer until the scan finishes, then you can reduce the priority given to the anti-virus software so that it doesn’t use all the CPU.

The values range from Low to Realtime, the latter which you should never use unless you really have nothing else running on your computer and you simply want one process to consume all the of CPU resources. You can also set the process to run on a particular CPU if you have more than one. Click on Set Affinity and you’ll get a dialog with 32 check boxes with everything disabled except for the number of cores on your computer. If you have one quad core CPU, that means you’ll have CPU 0 to CPU 4 available to check. If you have two dual core processors, you’ll also end up with four cores. Below I have two single core processors and therefore only two options.

By default, Windows will use the first processor on your computer for completing a task unless the program is designed to take advantage of multiple processors and cores. So if you want to run a non-optimized program on it’s own dedicated processor without interfering with the main processor used by Windows, just uncheck the box for the first processor for that particular application! Pretty cool!
Content Credits to: Aseem Kishore (online-tech-tips.com)


Post a Comment